Introduction
OAuth 2.0 & OpenID Connect does have a reputation of being complex, obscure and difficult to understand. And I think this reputation is well deserved 😋.
I guess the reason why it's so hard to understand is because of the many RFCs this protocol is spread to. Also the RFCs don't discuss the bigger concepts in an understandable manner and the problems that led to the development of the framework.
So this is the first post in a series of posts that aims to explain this open standard in a graspable manner. It documents my own endevaours to understand this protocol in more depth, as it is so vital to todays cloud and web services.
I am trying to keep things short and precise while at the same time trying not to suffer from oversimplification. But in the end it will be up to the reader to decide if I reached that goal...
I structured this series in five parts. The first part tries to impart the basics, show some real-life use cases and the terminology required to understand the more advanced topics.
Then in the remaining four parts we will dive a little deeper and have a look at the most important flows which are Authorization Code + PKCE, Client Credentials and Device Grant. The last part will then cover OpenID Connect (OIDC).
So without further ado let's get started!
OAuth 2.0 in action
It's very likely that you are already using OAuth without having even noticed it. Here are some real-life examples of OAuth in action, that will look familiar to you.
You are already making use of OAuth when...
... you log into Stackoverflow using your Google account
... you log into Dropbox with your Apple ID
... you backup your WhatsApp data to Google Drive
... you post a status update from your mobile using the Facebook mobile app
... LinkedIn suggests contacts for you to add by looking at your Google contacts
... you pin something on Pinterest from a WordPress blog
And of course there are many more real-life examples. Okay fine, now let's tackle this topic from a different angle.
What is OAuth 2.0 good for and what problems does it solve?
To answer this question we need to look back in history, when there was no such thing as OAuth 2.0.
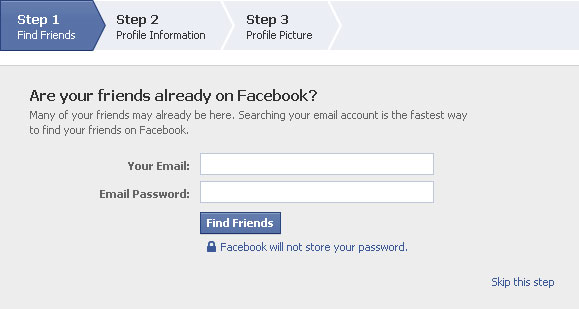
Let's take Facebook for example. Back in it's early days it used to ask you to connect your e-mails address book so you could find and invite your friends to join your network.
This is what the input form looked like:

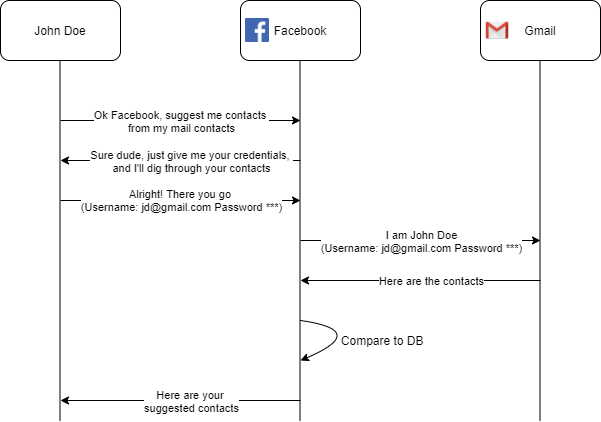
After having entered your e-mail credentials faithfully into the dialogue from above, Facebook logged into your mail account on behalf of you, went through your contacts, compared them to its database and saw if there where any matches to suggest.
This is what the process looked like from a birds eye perspective:

There are a few reasons why following this procedure was a bad idea. The main reasons are:
-
As Facebook got your credentials they have the power to do anything with your account. They are able to write e-mails in your name, read the e-mails you have sent and more... So besides only requiring access to your contacts you have given Facebook access to everything related to your mailbox!
-
Facebook is required to store your e-mail credentials (at least for a short amount of time). And you have to blindly trust them that they handle your secret with outmost care. You have no control over it!
-
You can't revoke access to your contacts without having to change your e-mail password. But changing your password would also revoke access other third-parties may require.
-
A compromise of Facebook would result in a compromise of your e-mail credentials and all of the data protected by that credentials.
The implied problem here is called the password anti-pattern. And the concept behind the described Facebook example is called delegated authorization...
And this is exactly where OAuth comes into play. It solves the beforementioned problems.
OAuth 2.0 solves the problem of the password anti-pattern that came up with the need for delegated authorization.
Before the advent of OAuth there was no possibility to give a third party (Facebook in our example) limited and revokeable access to a protected resource (our contacts) without having to hand over our service password (e-mail password in our case) to that third-party.
But OAuth does not only solve the challenge of delegated authority in a secure manner it also provides a secure solution for a concept called federated identity that we will discuss later.
Admittedly the terms delegated authority and federated identity sound obscure and abstract 🤔. To understand this two scenarios in more detail we require and understanding of the difference between the terms Authentication and Authorization. Let's move on.
Authentication vs. Authorization
Authentication
Authentication is a process that tries to verify that you are who you say you are.
Who are you?
It therefor describes the process of verifying the identity of a person that requests access to a system, network or device. This process is sometimes shortened to AuthN.
Methods for proving ones identity on the internet can be manifold. But the most common authentication method is password-based. So for example when you enter your username and password to access your Google services you are authenticating against that service and prove your identity to Google.

Authorization
Now authorization is a different thing. This process decides if you have the permission to access a resource or the privilege to perform some action.
Are you allowed to do that?
It focuses on the what and happens after ones identity has been proven. This process is sometimes shortened to AuthZ.
An example: When you log into your companies network you authenticate against it. And when you try to access a file share the system checks if you are authorized (done by an administrator beforehand) to access that protected resource. That's the authorization part which always happens after authentication.
Okay, let's now head back to our two abstract terms which where authority delegation and identity federation.
Delegated Authority & Federated Identity
Delegated Authority
Here is some slightly modified definition I took from here:
The concept of a delegated authority allows the owner of a set of resources to delegate access to some of those resources to a designated client application, without enabling the client application to impersonate the user.
I think the statement above describes the concept pretty well. But let's try to translate this sentence to our Facebook example.
The concept of a delegated authority allows us, as the owner of our e-mail account, to delegate access to our contacts to Facebook, without having to hand out our credentials to Facebook.
Okay, this should make sense now.
Federated Identity
Here is a definition I find very precise and completely:
Identity Federation is the process of delegating an individual’s [...] authentication responsibility to a trusted external party. Each partner in federation plays the role of either an identity provider (IdP) or a service provider (SP). In identity federation, an IdP vouches for the identity of the users, and an SP provides services to the users. When a user wants to access a service of an SP, the SP delegates the authentication to the IdP. This is called federation. For identity federation to take place, the SP must trust the authentication ability of the IdP. -- Dinika Senarath @medium.com
To make it simpler: The concept of a federated identity allows a user to log into an app with another account. It allows to delegate the authentication process to an external identity provider.
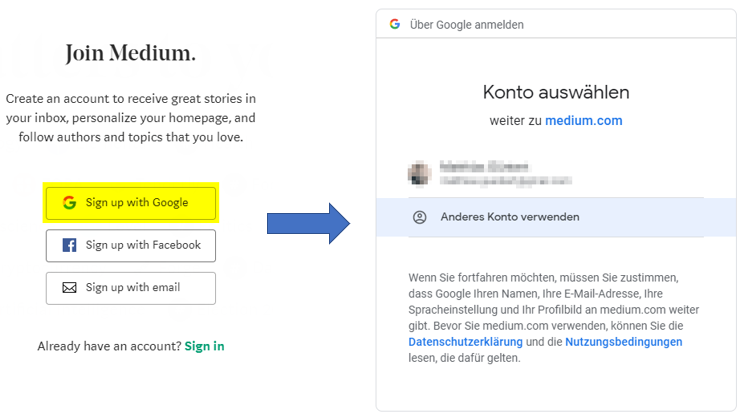
An example should make the above more graspable. Let's assume you have a Google account. Now you'd like to register with medium.com. But you don't want to create a new account on medium.com, make up a new password and remeber it. Instead you'd like to use your already existing Google identity.
When you sign-up at medium.com it provides you the option to use your existing Google account followed by a consent dialogue (provided by Google) that asks for acknowledgment. After having selected your Google ID you are signed up and logged in on medium.com.

Here Google acts as the IdP (Identity Provider) wheras medium.com is the SP (service provider), that trusts the authentication ability of Google.
At the moment where you decide to sign-up/login at medium.com with your Google account, the service provider (medium.com) delegates the whole authentication process to Google.
The service provider has no knowledge of your credentials and therefor doesn't have to take care about them from a security perspective. At the same time you don't have to care anymore about additional accounts and don't fall victim to the password fatigue. Awesome 😎
One more thing
Both, identitfy federation and delegedated authority are actually really the same. In both a protected resource is accessed on behalf of another party.
When talking about identity federation the protected resource is the user's account information and state, when talking about delegated authority the protected resource is something like our contacts mentioned in the example from the begining.
Identity federation can be accomplished with OAuth since the introduction of OpenID Connect (OIDC). This is an authentication layer build on top of the OAuth 2.0 authorization framework. We will learn more about OIDC in part 5.
Abstract Flow
Let's now discuss the abstract OAuth 2.0 flow that underpins every other flows. This is what it looks like (taken from RFC 6749, Section 1.2).
+--------+                               +---------------+
|        |--(A)- Authorization Request ->|   Resource    |
|        |                               |     Owner     |
|        |<-(B)-- Authorization Grant ---|               |
|        |                               +---------------+
|        |
|        |                               +---------------+
|        |--(C)-- Authorization Grant -->| Authorization |
| Client |                               |     Server    |
|        |<-(D)----- Access Token -------|               |
|        |                               +---------------+
|        |
|        |                               +---------------+
|        |--(E)----- Access Token ------>|    Resource   |
|        |                               |     Server    |
|        |<-(F)--- Protected Resource ---|               |
+--------+                               +---------------+
Step A - Authorization Request
The client requests authorization from the resource owner, by asking for consent to access a specific set of resources.
Step B - Authorization Reply
In case the resource owner consents to the authorization request it will return an authorization grant which is a credential representing the given authorization.
This cedential or authorization grant can be expressed in various grant types. There are four grant types specified in RFC 6749 Section 1.3, which are authorization code, implicit, resource owner password credentials and client credentials.
However we are not going to cover all of them in this series. Also because e.g. the implicit grant type shouldn't be used anymore and got replaced by something called Authorization Code + PKCE.
Step C - Token Request
The client now requests an access token by authenticating with the authorization server and presenting the authorization grant recieved in the previous step.
Step D - Token Reply
The authentication server authenticates the client and validates the `authorization grant, and if valid, issues an access token.
Step E - Resource Request
The client requests the protected resource from the resource server and authenticates by presenting the access token.
Step F - Resource Reply
The resource server validates the access token, and if valid, returns the requested data.
Key take-aways
-
AuthN (authentication) is a process that tries to verify that you are who you say you are.
-
AuthZ (authorization) is a process that decides if you have the privilege to perform some action
-
The concept of delegated authority allows the owner of a set of resources to delegate access to some of those resources to a designated client application, without enabling the client application to impersonate the user (= handing out the password). This is what you use when you let Facebook dig through your Google Contacts.
-
The concept of identity federation is the process of delegating a persons authentication responsibility to a trusted external party. This is what you use when log into medium.com using your google account.
-
OAuth solves the concept of delegated authority and identity federation in a secure manner by eliminating the password anti-pattern.
I suggest to go through the terminology now that I put in a separate post to keep this here more readable.
Thanks for reading 😊. If you have any questions or find something that is vague or even plain wrong, please drop me a message 🦾.


