Introduction
There might be situations where you have to ensure that your App Service is using a fixed IP address.
For example when your web application has to call an external endpoint that has restrictive inbound firewall rules which you can't control. Another situation might be that the lifecycle of your app service is bound to a CI/CD pipeline. And you don't want the app service to have a new IP address every time it gets recreated.
Whatever your reasons might be, in this post I am going to show you how to use static IP addresses together with Azure App Service. But first, let's see why they change generally.
When do IP addresses change?
Microsoft lists the following events that will result in a change of the IP addresses:
| Inbound IP | Outbound IP |
|---|---|
| You delete an app & recreate it in a different resource group | You delete an app & recreate it in a different resource group |
| You delete the last app in a resource group & region combination and recreate it | You delete the last app in a resource group & region combination and recreate it |
| You delete an existing IP-based TLS/SSL binding, such as during certificate renewal | You scale your app between the lower tiers (Basic, Standard, Premium) and the Premium V2 tier |
To understand why the events from above cause an IP change, we need to understand what webspaces are.
What are webspaces?
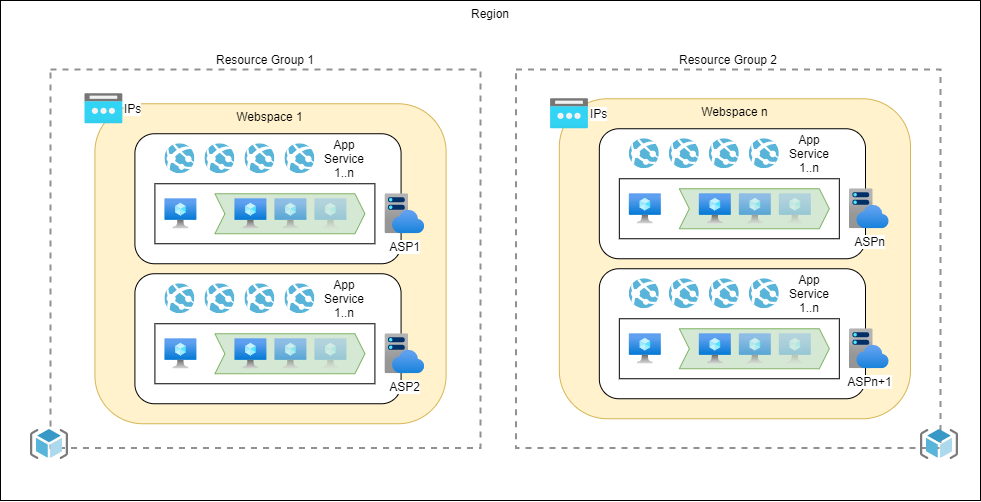
In general, a webspace can be seen as a virtual grouping of application service plans (ASP). Whereas an ASP is basically a group of virtual machines running one or more websites. That's the reason why ASPs internally are called serverFarms. App Services on the other hand are internally called sites.
In case a scale-out event happens (!= scale-up), additional virtual machines are added to the ASP.
Now this webspaces, or deployment units, can not be created by the user. They are managed for us by the Azure Resource Manager and are covered under the hood. The following diagram provides an overview.

Now what's important to note here, is that all plans created with the same resource-group / region combination end up in the same webspace. And further, all public IP addresses are bound to this webspace. Let's dive a little deeper.
Here I am making a low-level call to Azure Resource Manager, requesting details about my ASPs which are inside the resource group rg-app-services.
As you can see from the output below, I got two ASPs, one in region North Europe and one in region West Europe. Both belong to different webspaces, which are called rg-app-services-NorthEuropewebspace and rg-app-services-WestEuropewebspace.
$ az rest \
--method get \
--url https://management.azure.com/subscriptions/<subscription-id>/resourceGroups/rg-app-services/providers/Microsoft.Web/serverfarms?api-version=2018-02-01 \
--query value[].[name,type,location,properties.serverFarmId,properties.webSpace]

[
  [
    "asp-linux-free",
    "Microsoft.Web/serverfarms",
    "North Europe",
    1650,
    "rg-app-services-NorthEuropewebspace"
  ],
  [
    "asp-windows-free",
    "Microsoft.Web/serverfarms",
    "West Europe",
    13109,
    "rg-app-services-WestEuropewebspace"
  ]
]
This fact explains the table provided from above. If you delete and recreate an app service in a different resource group, it ends up in a different webspace having different public IP addresses attached to it!
Below I am querying Azure Resource Manager again, but this time for site details. It also carries a property called properties.webSpace, and some more details about possible inbound and outbound IP addresses.
$ az rest \
--method get \
--url https://management.azure.com/subscriptions/<subscription-id>/resourceGroups/rg-app-services/providers/Microsoft.Web/sites?api-version=2018-02-01 \
--query value[0].[name,properties.webSpace,type,location,properties.inboundIpAddress,properties.possibleInboundIpAddresses,properties.outboundIpAddresses,properties.possibleOu
tboundIpAddresses]

[
  "azureblue-demo1",
  "rg-app-services-NorthEuropewebspace",
  "Microsoft.Web/sites",
  "North Europe",
  "13.69.228.0",
  "13.69.228.0",
  "13.69.228.0,13.79.17.70",
  "13.69.228.0,13.79.17.70,40.69.68.183,13.79.2.202,40.127.170.154,40.127.162.107,13.79.5.187"
]
Please note, there are simpler methods to get to the IPs, I made this low-level call to provide details about the underlying webspace, only.
# Find inbound IPs
nslookup <app-name>.azurewebsites.net

# Find outbound IPs
az webapp show --resource-group <group_name> --name <app_name> --query outboundIpAddresses --output tsv

# Find all possible outbound IPs
az webapp show --resource-group <group_name> --name <app_name> --query possibleOutboundIpAddresses --output tsv
Now enough with the details, let's see how we finally can use fixed IPs.
Using a static outbound IP
Use Azure NAT Gateway
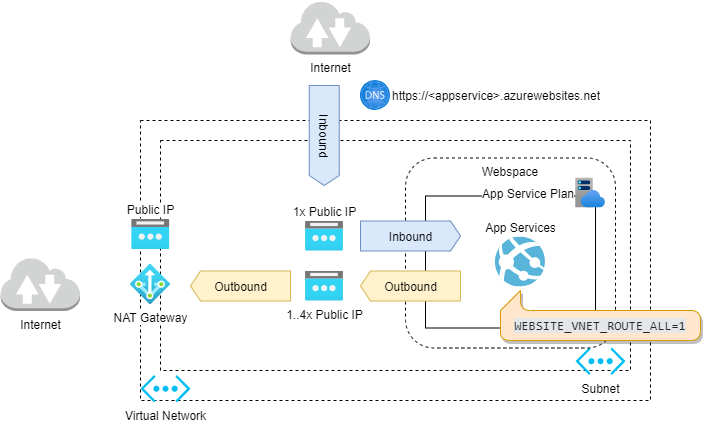
One way is to leverage a NAT Gateway for this purpose and you will end up with an architecture as depicted in the diagram.

Steps
- Configure regional virtual network integration from within your app service.
- Force all outbound traffic originating from that app to travel through the virtual network. This is done by setting
WEBSITE_VNET_ROUTE_ALL=1property in your web app configuration - Create a public IP address.
- Add a NAT gateway, attach it to the subnet that contains the app service and make use of the public IP created in step 3.
Constraints
There are a couple of restrictions worth mentioning. First, this approach requires an App Service Plan that supports virtual network integration (Standard or Premium). And second, the inbound IP could still change.
Using a static inbound IP
Use TLS-Binding
Steps
- Add a custom domain and verify your ownership.
- Buy or create a self-signed certificate (see PowerShell script below).
- Add a binding and upload your certificate.
- Select your certificate and set to "IP Based SSL".

You can use this short PowerShell script to create a self-signed certificate.
# Create a certificate
$cert = New-SelfSignedCertificate -DnsName demo.azureblue.io -CertStoreLocation "Cert:\CurrentUser\My"

# Create a secure string
$secret = ConvertTo-SecureString -String "Abracadabra" -Force -AsPlainText

# Export using PFX format
Export-PfxCertificate -FilePath C:\Temp\demo-azureblue-io.pfx -Password $secret -Cert $cert

# Tidy up
Get-ChildItem "Cert:\CurrentUser\My" | where Subject "CN=demo.azureblue.io" | Remove-Item
Constraints
To create custom security bindings, your App Service plan must be in the Basic, Standard or Premium tier.
Use Azure Application Gateway
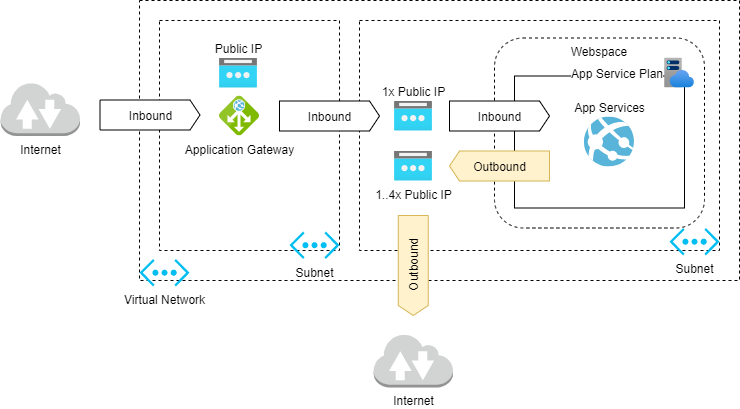
I am not going to cover all the details required for this setup. But the high-level steps should get you going. The trick is to use the gateway together with service endpoints to reach our desired result.
Steps
- Create an Application Gateway inside a subnet
- Create a public static standard IP address
- Add your App Service as a backend
- Enable service endpoints (Microsoft.Web) for the subnet holding your gateway, so that incoming traffic (from Internet via Gateway) to the App Service travels through the Azure Backbone
- (Optionally) Lock down access to your App Service using IP Filtering

Conclusion
As we have seen we can use a NAT Gateway to get a static outbound IP, and TLS-Binding or an Application Gateway for static inbound IPs.
Of course, no one stops you from mixing a NAT Gateway together with TLS-Binding, to fix both, incoming and outgoing IPs.
So that's it for today. I hope you found this post informative, and as always feedback is welcome! Stay well! 😎
Further links


