Introduction
Currently, I am evaluating different Identity and Access Management solutions as an alternative to ASP.NET Core Identity. Besides FusionAuth I wanted to test-drive Auth0 together with ASP.NET Core Blazor.
Although Auth0 provides rich documentation, no easy-to-follow example was available for ASP.NET Core 9.
This article fills this gap and runs you through the required steps to get started with Auth0.
TL;DR?
Here is the direct link to my demo repository
Configure Auth0
First, we need to create a new application. For a Blazor Server, we need to select Regular Web Applications.
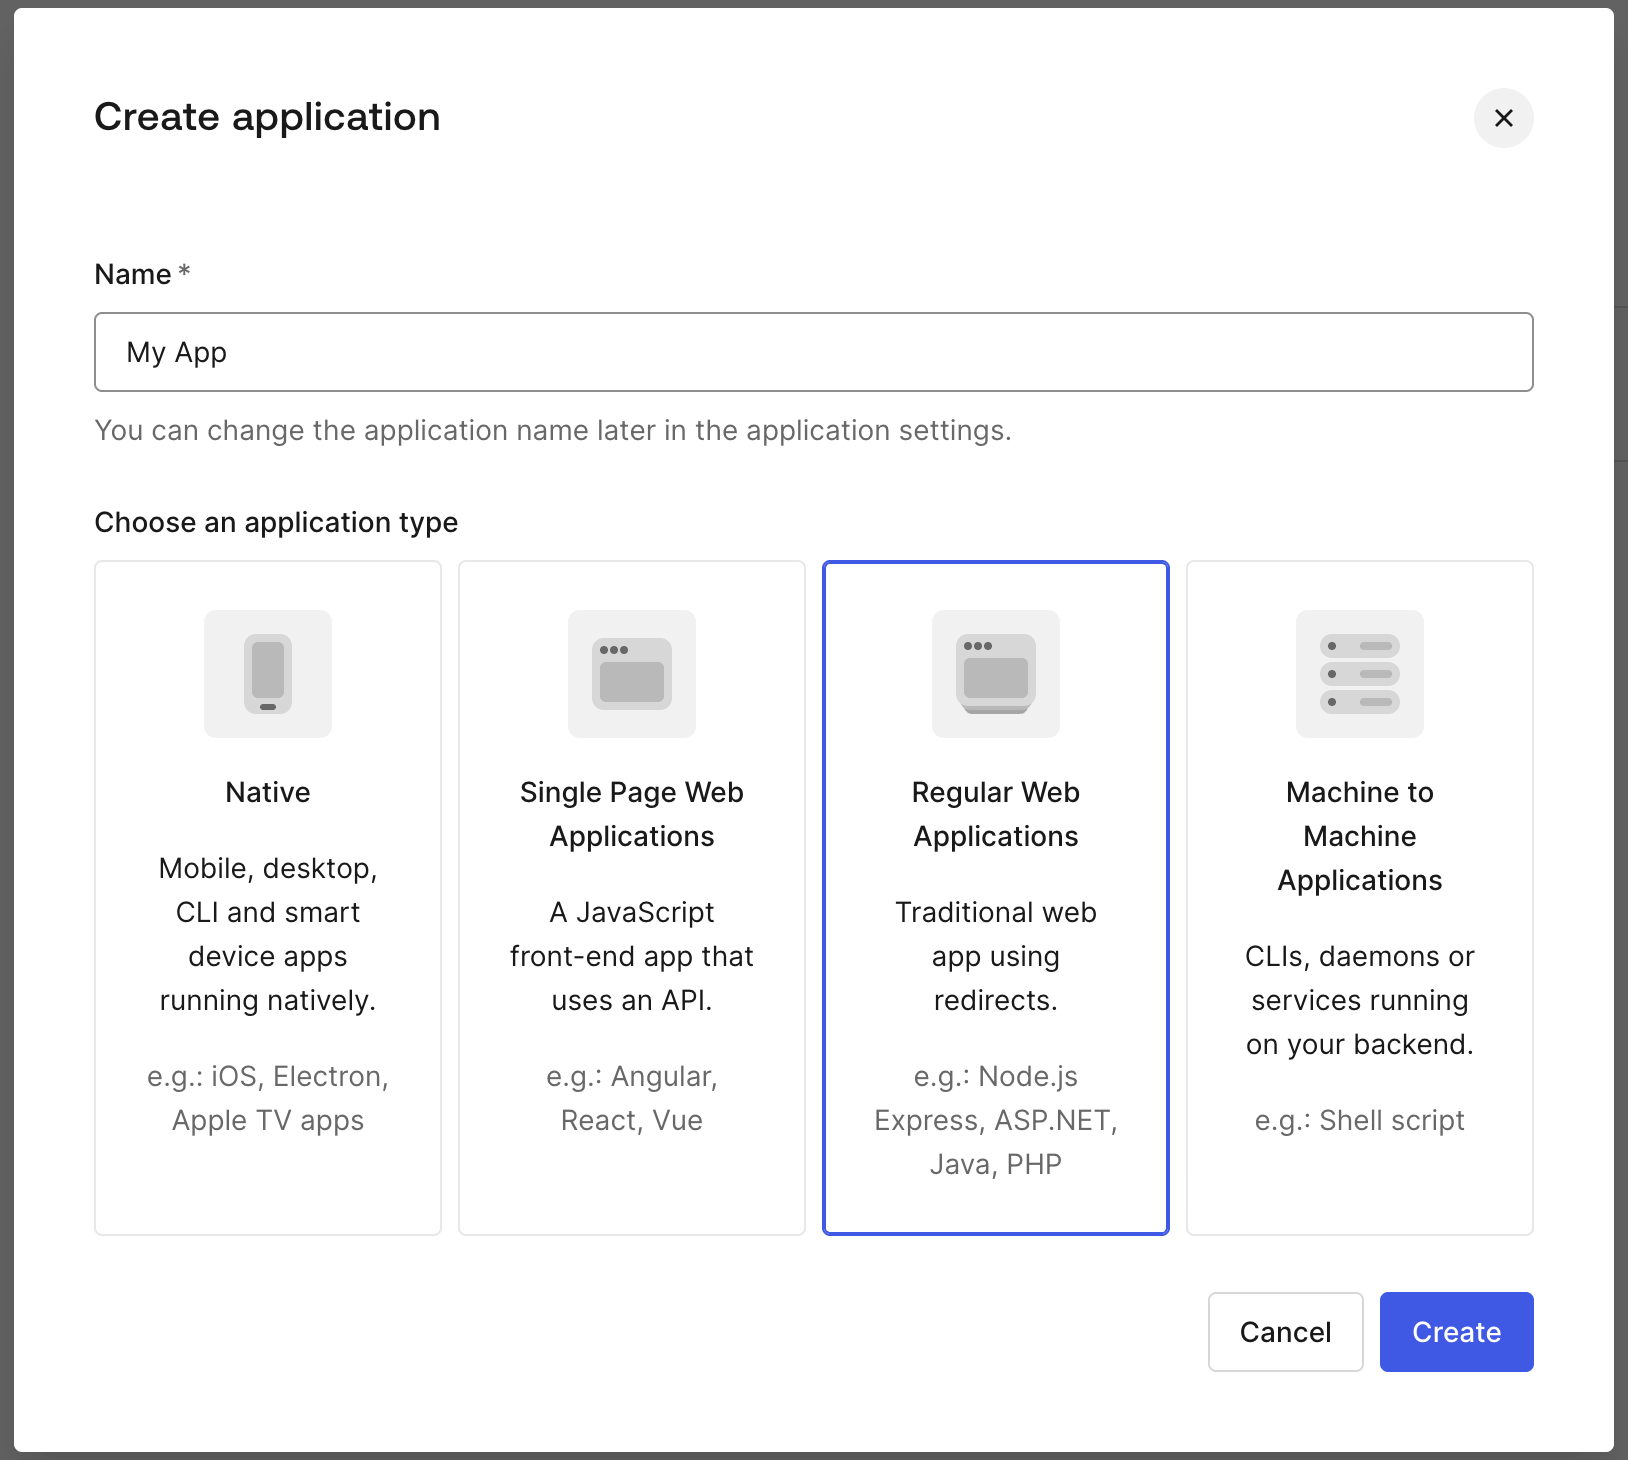
After successful creation, make a note of your Domain and Client ID found under Settings.
Configure Callback URLs
Next, we need to adjust the list of Allowed Callback URLs and add https://localhost:7063/callback for local testing.
Configure Logout URLs
For the logout to work, we need to add https://localhost:7063
Install and configure the SDK
Register middleware
Add the required NuGet package Auth0.AspNetCore.Authentication to your project and register the Auth0 middleware with the DI container.
builder.Services.AddAuth0WebAppAuthentication(options =>
{
    options.Domain = builder.Configuration["Auth0:Domain"];
    options.ClientId = builder.Configuration["Auth0:ClientId"];
    options.Scope = "openid profile email";
});
Program.cs
Add configuration
As you can see from above, the setup expects the following keys to exist in your appsettings.json. Paste the information accordingly.
  "Auth0": {
    "Domain": "<your-domain>",
    "ClientId": "<your-client-id>"
  }
appsettings.json
Add the login endpoint
Now it's time to create a minimal API endpoint to provide the login functionality.
This is where we call ChallengeAsync and pass the authentication properties created by the LoginAuthenticationPropertiesBuilder and the Auth0 authentication schema. The latter also defines the default callback path /callback.
From the official documentation
After successfully calling HttpContext.ChallengeAsync(), the user will be redirected to Auth0 and signed in to both the OIDC middleware and the cookie middleware upon being redirected back to your application. This will allow the users to be authenticated on subsequent requests.app.MapGet("/Login", async Task (HttpContext httpContext, string returnUrl = "/") =>
{
var authenticationProperties = new LoginAuthenticationPropertiesBuilder()
.WithRedirectUri(returnUrl)
.Build();
await httpContext.ChallengeAsync(Auth0Constants.AuthenticationScheme, authenticationProperties);
});
Program.cs
Add the logout endpoint
Logging out happens by calling SignOutAsync on the HttpContext. As you can see, this call was made twice.
The first call will log the user out of Auth0, and the second will log the user out of your application. This will also log a user out of other applications that rely on SSO (single sign-on)
app.MapGet("/Logout", async (HttpContext httpContext) =>
{
    var authenticationProperties = new LogoutAuthenticationPropertiesBuilder()
        .WithRedirectUri("/")
        .Build();

    await httpContext.SignOutAsync(Auth0Constants.AuthenticationScheme, authenticationProperties);
    await httpContext.SignOutAsync(CookieAuthenticationDefaults.AuthenticationScheme);
});
Program.cs
Adjust routing
Next, we'll modify the routing configuration defined at Components/Routes.razor. Make sure to add the required using statements to _Imports.razor.
...
@using Microsoft.AspNetCore.Authorization
@using Microsoft.AspNetCore.Components.Authorization
_Imports.razor
Add <CascadingAuthenticationState>, which provides the authentication state (e.g., whether the user is logged in) to all components below it in the hierarchy. It wraps the entire router, so any page can access the current authentication state using the AuthenticationStateProvider.
<CascadingAuthenticationState>
  <Router AppAssembly="typeof(Program).Assembly">
    <Found Context="routeData">
      <AuthorizeRouteView RouteData="routeData" DefaultLayout="@typeof(Layout.MainLayout)">
        <Authorizing>
          <p>Authorization is in progress, please wait!</p>
        </Authorizing>
        <NotAuthorized>
          <p>You're not authorized, please log in!</p>
        </NotAuthorized>
      </AuthorizeRouteView>
      <FocusOnNavigate RouteData="routeData" Selector="h1"/>
    </Found>
  </Router>
</CascadingAuthenticationState>
Routes.razor
The router uses the AuthorizedRouteView element, which is like the regular RouteView but with built-in support for authentication and authorization.
The Authorizing element, defines content that will be rendered while asynchronous authorization is in progress, and NotAuthorized defines the content that will be displayed if the user is not authorized.
FocusOnNavigate will focus on the first <h1> element, which is helpful for accessibility and screen readers.
Conclusion
That's all that is required for the basic setup. For demo purposes, I have added a Profile page and adjusted the NavMenu.

To summarize
- Create an Auth0 application
- Add the required NuGet package
- Add configuration settings
- Add middleware and endpoints
- Adjusts routing
Further reading